Sunday, 15 July 2012

Stenciling D.I.Y

Stenciling is a really easy way to change a garment or accessory, by simply spray painting through a stencil.

For my stenciling I created triangles with masking tape and covered the rest of the dress with more masking tape and plastic bags to protect it, then using fabric spray paint I covered the triangle areas (making sure not to spray too close as it blurs the edges). Once the paint is dry I applied another coat and once that coat was dry I peeled off the tape (very fun!!) to reveal the design. 

Testers...


Ooh! Just noticed it is my bloggiversary annibloggery? well either way I started blogging a year ago! So in the spirit of this occasion (if I can really call it an occasion?) I want to start some different posts, this is where you come in useful and tell me what you would like me to post. More fashion/ textiles/ craft/ tutorials/ DIY/ photography? Or something different? I am at your command so please leave a comment or email milliebutler-hiorns@hotmail.co.uk   
Any ideas would be much appreciated.

Friday, 29 June 2012

Fashion show 2012

Yesterday was my college fashion show and as promised here are some pictures, unfortunately though I haven't yet got any pictures of the catwalk! Here are my final pieces being beautifully modeled in the changing rooms (very messy!!!)


Woodland life Spring/summer 2012


Thursday, 21 June 2012

How to make a notebook cover

Making a cover for a notebook/sketchbook is super easy, can use up small bits of fabric and would make someone a lovely gift.


STEP ONE: Measure the notebook you want to cover (if you are using a ring-bound notebook you need to also measure around this).

STEP TWO: Choose your fabrics. I chose lots of different fabrics to patchwork together but you could just use one. The length of your fabric(s) will be the length of your notebook +seam allowance ( I used 0.75cm seam allowance) and the width of the fabric needs to be enough to go all the way around the notebook covers, including the inside of the covers. This will be roughly 4x the width of the notebook, but remember to add extra for the spine or ring-binding!

STEP THREE: If you are using lots of panels patch-worked together then stitch your panels together until you have one long strip. 
Then iron your seams flat.
You should now have a piece of fabric that is slightly more that the length of the notebook and wide enough to go around the covers. 

STEP FOUR: At this stage I added some elastic (in a fabric tube) to the front as a handy place to store a couple of pens, but this is not essential.


STEP FIVE: With the two length ends (usually the shorter two) you need to hem them so that you don't have raw edges showing.


STEP SIX: Try your length of fabric on the notebook so that the good side is facing the notebook. Mark where the fabric ends (the ones you hemmed earlier) meet the fabric on the outside of the notebook, but make sure that you can still open and close it! Now stitch the fabric with right sides together to create two pockets (one for each cover). It should now look something like this...


You will notice there are raw edges still showing, so you need to hem those down and then it will look like this...


STEP SEVEN: Now all you need to do is insert the notebook into it's new case. You will need to bend the covers right back to do this. 
FINISHED!


And why stop there? The same method could be used to cover your favourite read or could be personalized with an applique, embellishment or ribbon ties. 

Have fun sewing, Millie x


Wednesday, 20 June 2012

Ladybird nails!!

Looking through some old photos the other day and I found these which reminded me I used to have my nails painted with cool things (well I thought they were cool :P) and probably also had too much spare time on my hands.

 Can you spot the bumble bees?
So today, being one of those rare occasions- a spare day, I thought in the spirit of these pictures I would paint myself some novelty ladybird nails!! I have always been a fan of childish novelty nails, but sometimes I do proper grown up nails with flowers!!!


 Yayy Hello ladybirds! Ok, maybe I should've cleaned up the edges before taking the photograph??
Childish or nostalgic and fun? Obviously I am of the latter opinion!!

Saturday, 16 June 2012

Final Garments!

I must start my post by apologizing for my lack of blogging lately as I have been busy busy busy! But I think that's a good reason to have a bit of a blogathon now!

If you haven't read previous posts then let me inform you that the theme of this project was Woodland life.

I haven't got photos yet on actual real people so mannequins will have to suffice, but the fashion show is taking place at the end of June so I will get some photos then (when they will also have hair, make-up and accessories)


 You may have noticed that the under-dress on this doesn't sit quite right, this is because the bust of the mannequin isn't big enough to hold the dress up.

 I made this skirt by knitting wire and molding it into shape (An estimated time of nearly 30 hours solid knitting!!!-That is commitment!)

I will post my pictures form the fashion show soon, so watch this space...(well after June 28th anyway!)


Wednesday, 30 May 2012

Final Major Madness...

Hello, I must start this post by apologizing as it has been far too long since I last posted, but I have been in the midst of my final major project and have been crazy busy! So I thought I would show you what I have been doing.

As some of you may know from previous posts, I was doing my project on Cartography, however I decided several weeks into this that it wasn't right for me! I am now doing a project called 'Woodland life' and I think I have caught up now! It's been a really good topic for creating textile samples and print designs, here are a few of my favorites...

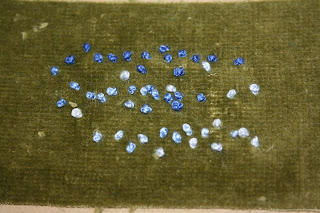
French knots on velvet- this sample reflect the bluebells in Woodlands.
 Machine embroidery

 Heat transfer owls
 I did some sketches of different elements of woodlands from photographs I took at Swanbourne lake woodlands.
 Manipulated sketches- I repeated my sketches to create a print design.
Heat transfer 


 Heat transfer leaf skeletons

copy of William Morris' 'Strawberry Thief'
 William Morris style mouse design

 Copies of Ernst Haeckel botanical drawings in biro with addition of knitted rendering.
 Copies of Yoko Furusho's illustrations
 Lino printing with french know detail
 Machine embroidery with wool thread
 Hand dyed Calico

And here are some of my designs...


 You may have noticed design two is looking slightly bare, but let me re-assure you this is just because I haven't drawn in the detail yet, it will be covered in heat transfer leaves!

I have nearly finished making design one so far and I will post the pictures when they are all finished!

Thanks for reading,

Millie
x